My Experience in Preparing and Racing Arnolt Bristols
by Bill Watkins
July, 2009
Disclaimer: The following is a discussion of things that I learned while racing Arnolt Bristols from 1957 to 2003 (with time-out from 1960 to 1979). Although I believe that everything I say is true, I am not making any recommendations. Some may lower the collector value of the car, others may violate the rules of some racing organizations, and some may not improve the performance of your car. If you see any errors or want to add information, please contact me at:
sniktaw79@yahoo.com.Over the years, I have owned and raced four Arnolt Bristols and a Cooper Bristol. In addition, I bought a D2 engine and gearbox that was removed from an AC Bristol coupe. I have raced these cars from California to New York and in Mexico, England and New Zealand.
During that time, in an attempt to improve performance and reliability as well as to replace components that were scarce or too costly, I have made certain substitutions.
1.0 Engines
1.1 CarburetorsThe BS1 Mk II engine in the Arnolt comes with Solex 32 BI carbs (no pumps). The first improvement was to flatten the throttle shafts to increase the area for more air flow. The car performed best with 140 main, 240 air correction and 60 idle jets. The venturis were 28 mm. One of the problems is the wear around the throttle shafts which causes poor idling but has little effect at speed. A similar carb is on the Volkswagen Beetle and that is a source for gaskets.
The Weber 34 ICH carb is available as an after-market replacement for the Solexes on the VW. I put them on the Arnolts and they were on the Cooper when I bought it. It is necessary to remove the choke plate and the electric starter valve which is replaced with a fixed jet. I used the same size jets as with the Solex. The venturis were 29 mm. The floats are set to 6.5/7.0 mm under the float (with the cover inverted) and 13.5 mm when it is hanging. This is important.
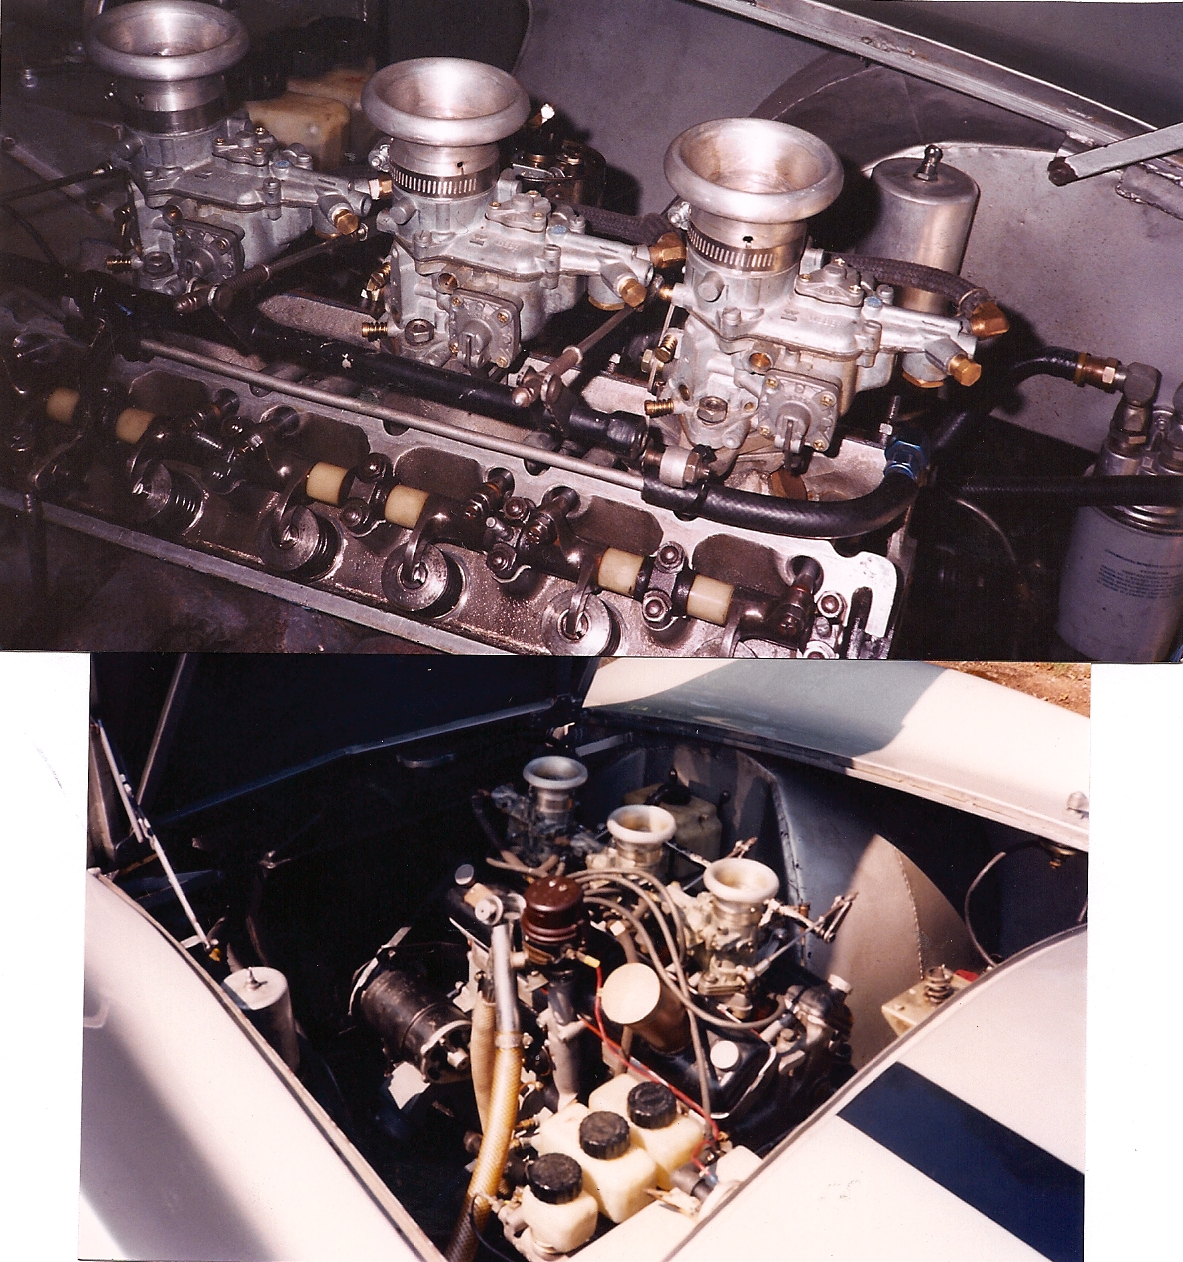
Caption for photo below:
If you are towing a long distance, it is important to keep the float bowls filled or reset the floats when you get to your destination. A low fuel level cab ruin your whole weekend! Fitting the carburetors is fairly straight forward. I don't recall whether the stud spacing was the same; it may be necessary to elongate the stud spacing in the carb base. The adaptor from carb to head needs to be ground to a 2 mm taper and the fittings on the linkages can be replaced with rods ends. The plumbing requires modifications as shown below. I believe the stock air cleaners are restrictive, so I don't run them. Instead I used air horns and put open-cell foam material and screen wire in the hood scoop opening to keep out the big chunks.
1.2 Compression ratio.
I ran a compression ratio of 10.5:1 to 11:1 with various combinations of piston crowns and milling of heads and block deck heights. Because of the small bore and central spark plug location, the flame front is very short and the engine runs fine on premium pump gas. The stock engine requires only regular. I ran aviation 100LL for a while until I learned that because it is blended for low vapor pressure at altitude results in it having less energy than car gas.
1.3 Crankshafts.The BS1 Mk II engine comes with the small-nose non-counterbalanced crankshaft. I learned from experience back in the 1950’s that it was totally unreliable for racing. I do know of a Cooper Bristol driver who uses them because of their low rotary inertia. I don’t know how long they last for him, but it was crankshaft problems that caused me to give up racing ABs in the ‘50s. I couldn’t keep center main bearings and a couple cranks cracked. All my cars from 1979-on had big-nose cranks.
The Arnolts had D2 cranks and the Cooper came with the long stroke (2.2 liter) crank.
But even the big-nose cranks didn’t last forever and I had several billet cranks (for myself and others) made by Henry Velasco of Downey, California. (562) 862-3110.
For a while, I used Ford Cortina main bearings with standard Bristol crank diameters. However, the Cortina crank is .0013" larger than the Bristol. This resulted in low oil pressure at high oil temperatures. I tried to solve this by modifying the oil pump by incorporating a longer rotor. This solved the oil pressure problem, but turned out to be a disaster. The extra load destroyed the gear on the cam that drives the pump and the distributor. This happened about half way between Ensenada and San Felipe, Mexico in an open road race. The Cortina bearings work OK if the journals are properly sized. They are a little bit wide for the center mains, but this can be solved by scraping a chamfer on each edge. They are too narrow for the no. 1 & 4 mains which causes them to be offset. This requires some adjustment to the oil groove, but they work OK.
MGB bearings are wider and are a better choice for the 1 & 4 positions. However, they require a slightly larger journal than the Cortina bearings. I had the billet cranks ground as follows:
Journals 1 & 4: 2.1270/2.1265 in.
Journals 2 & 3: 2.1258/2.1253 in.
Rod journals are as Bristol standard: 1.7710/1.7705 which is the same as Alfa Guiletta 1300 and T series MG.
The MG bearings that I have used are not Indium Lead as are the Alfa bearings but they work OK. The width is right for the small-nose crank, but must be narrowed by .1 in. for the big nose crank. Clevite now makes what used to be Vanderval. The P/N is CBS/4-679P
The small nose crank used a vibration damper with rubber in it. That probably contributed to the torsional stresses that caused failures of those shafts. The D2 cranks have a viscous damper that is much better.
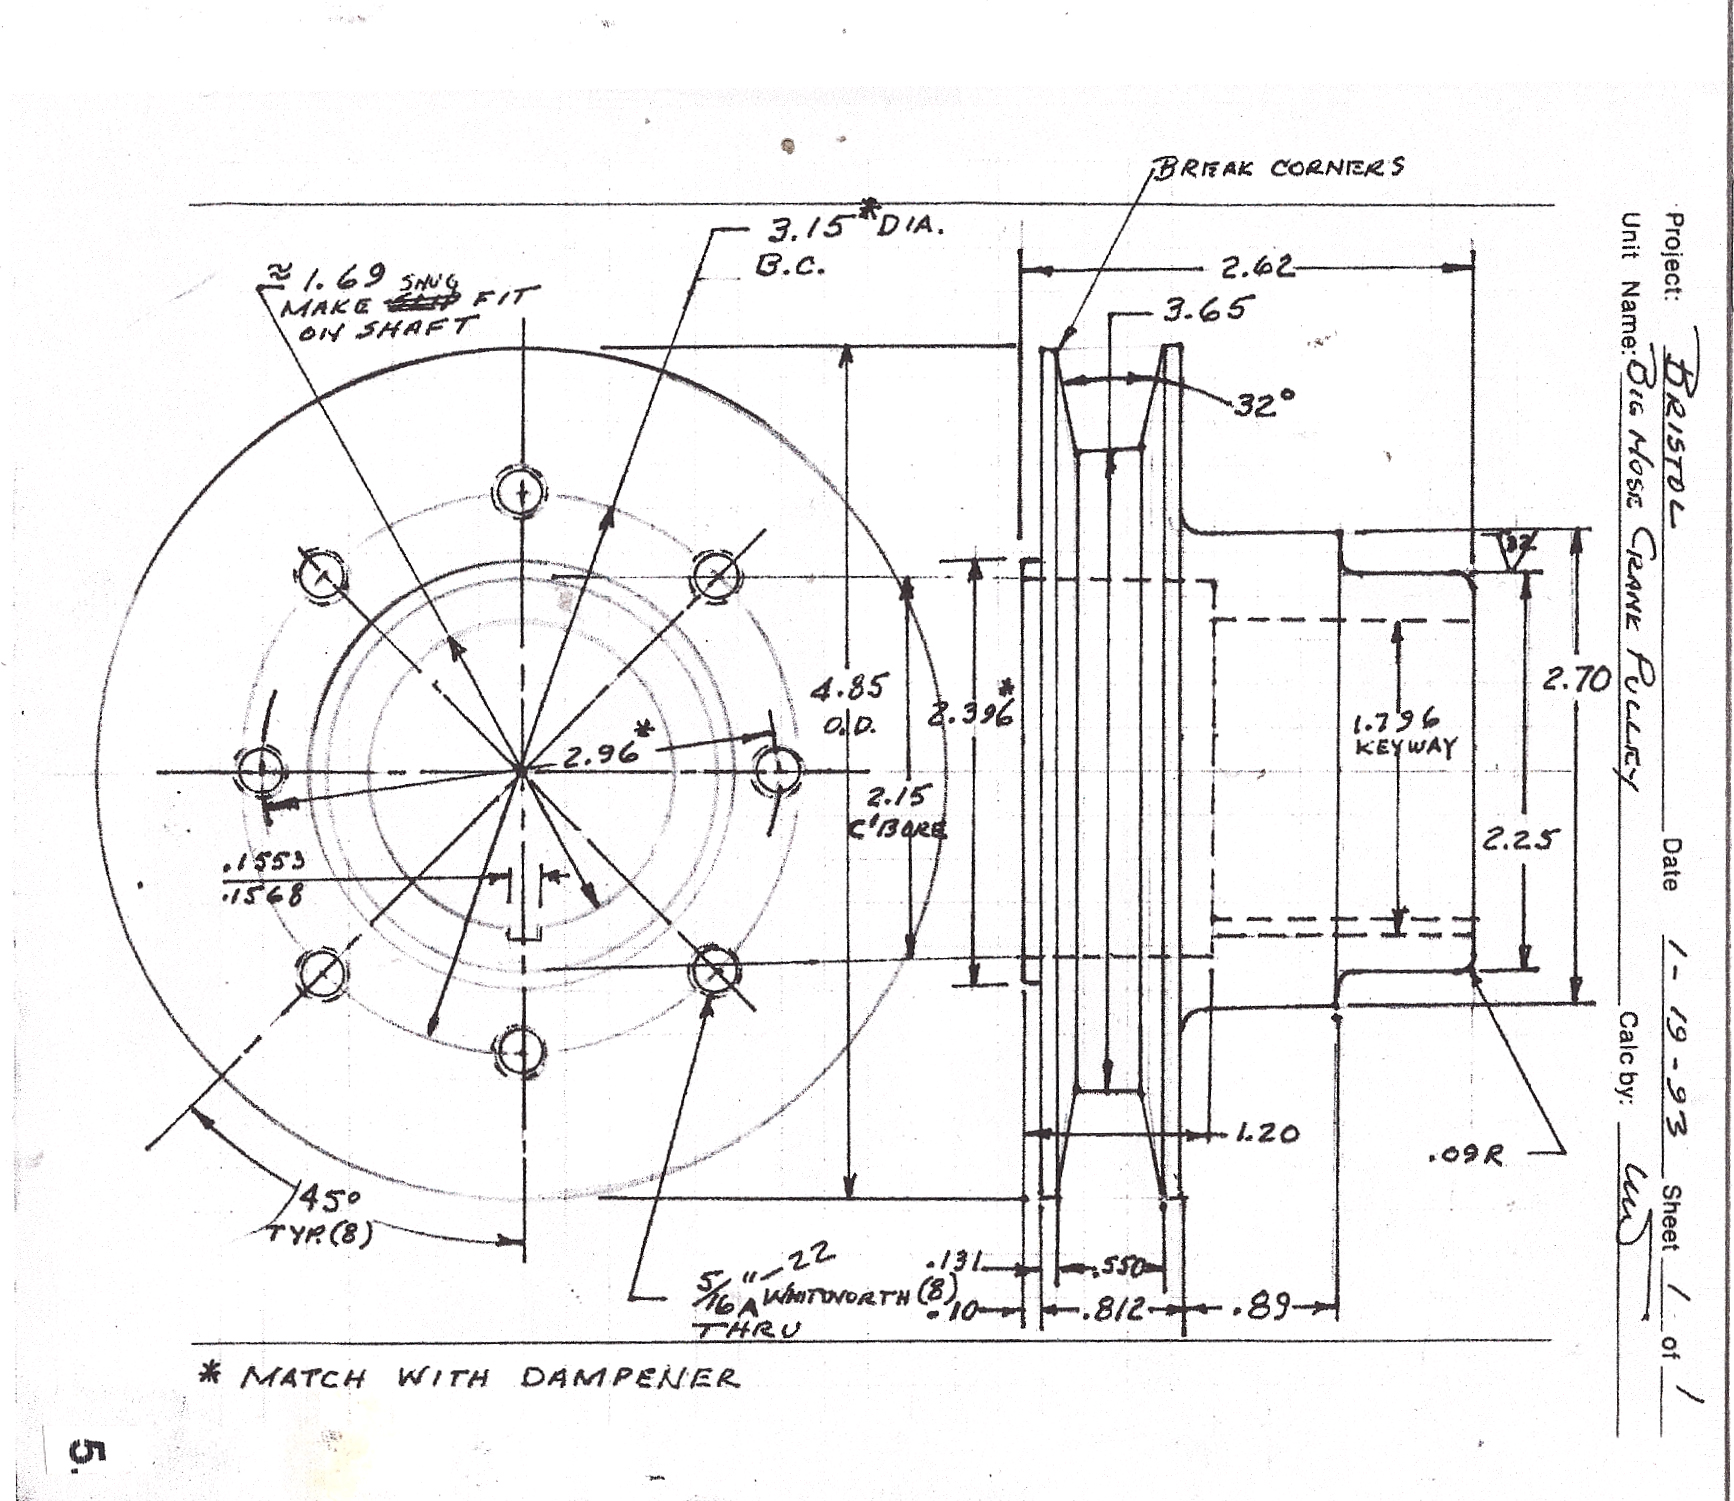
It’s important that the front pulley that carries the vibration damper have a snug (slight interference) fit on the crank nose. Otherwise (and this happened to me) the torsional vibration will cause the pulley to seize onto the shaft and become impossible to remove. As a result, I had to have a new pulley made as shown below. (click to expand thumbnail to full sized-image)
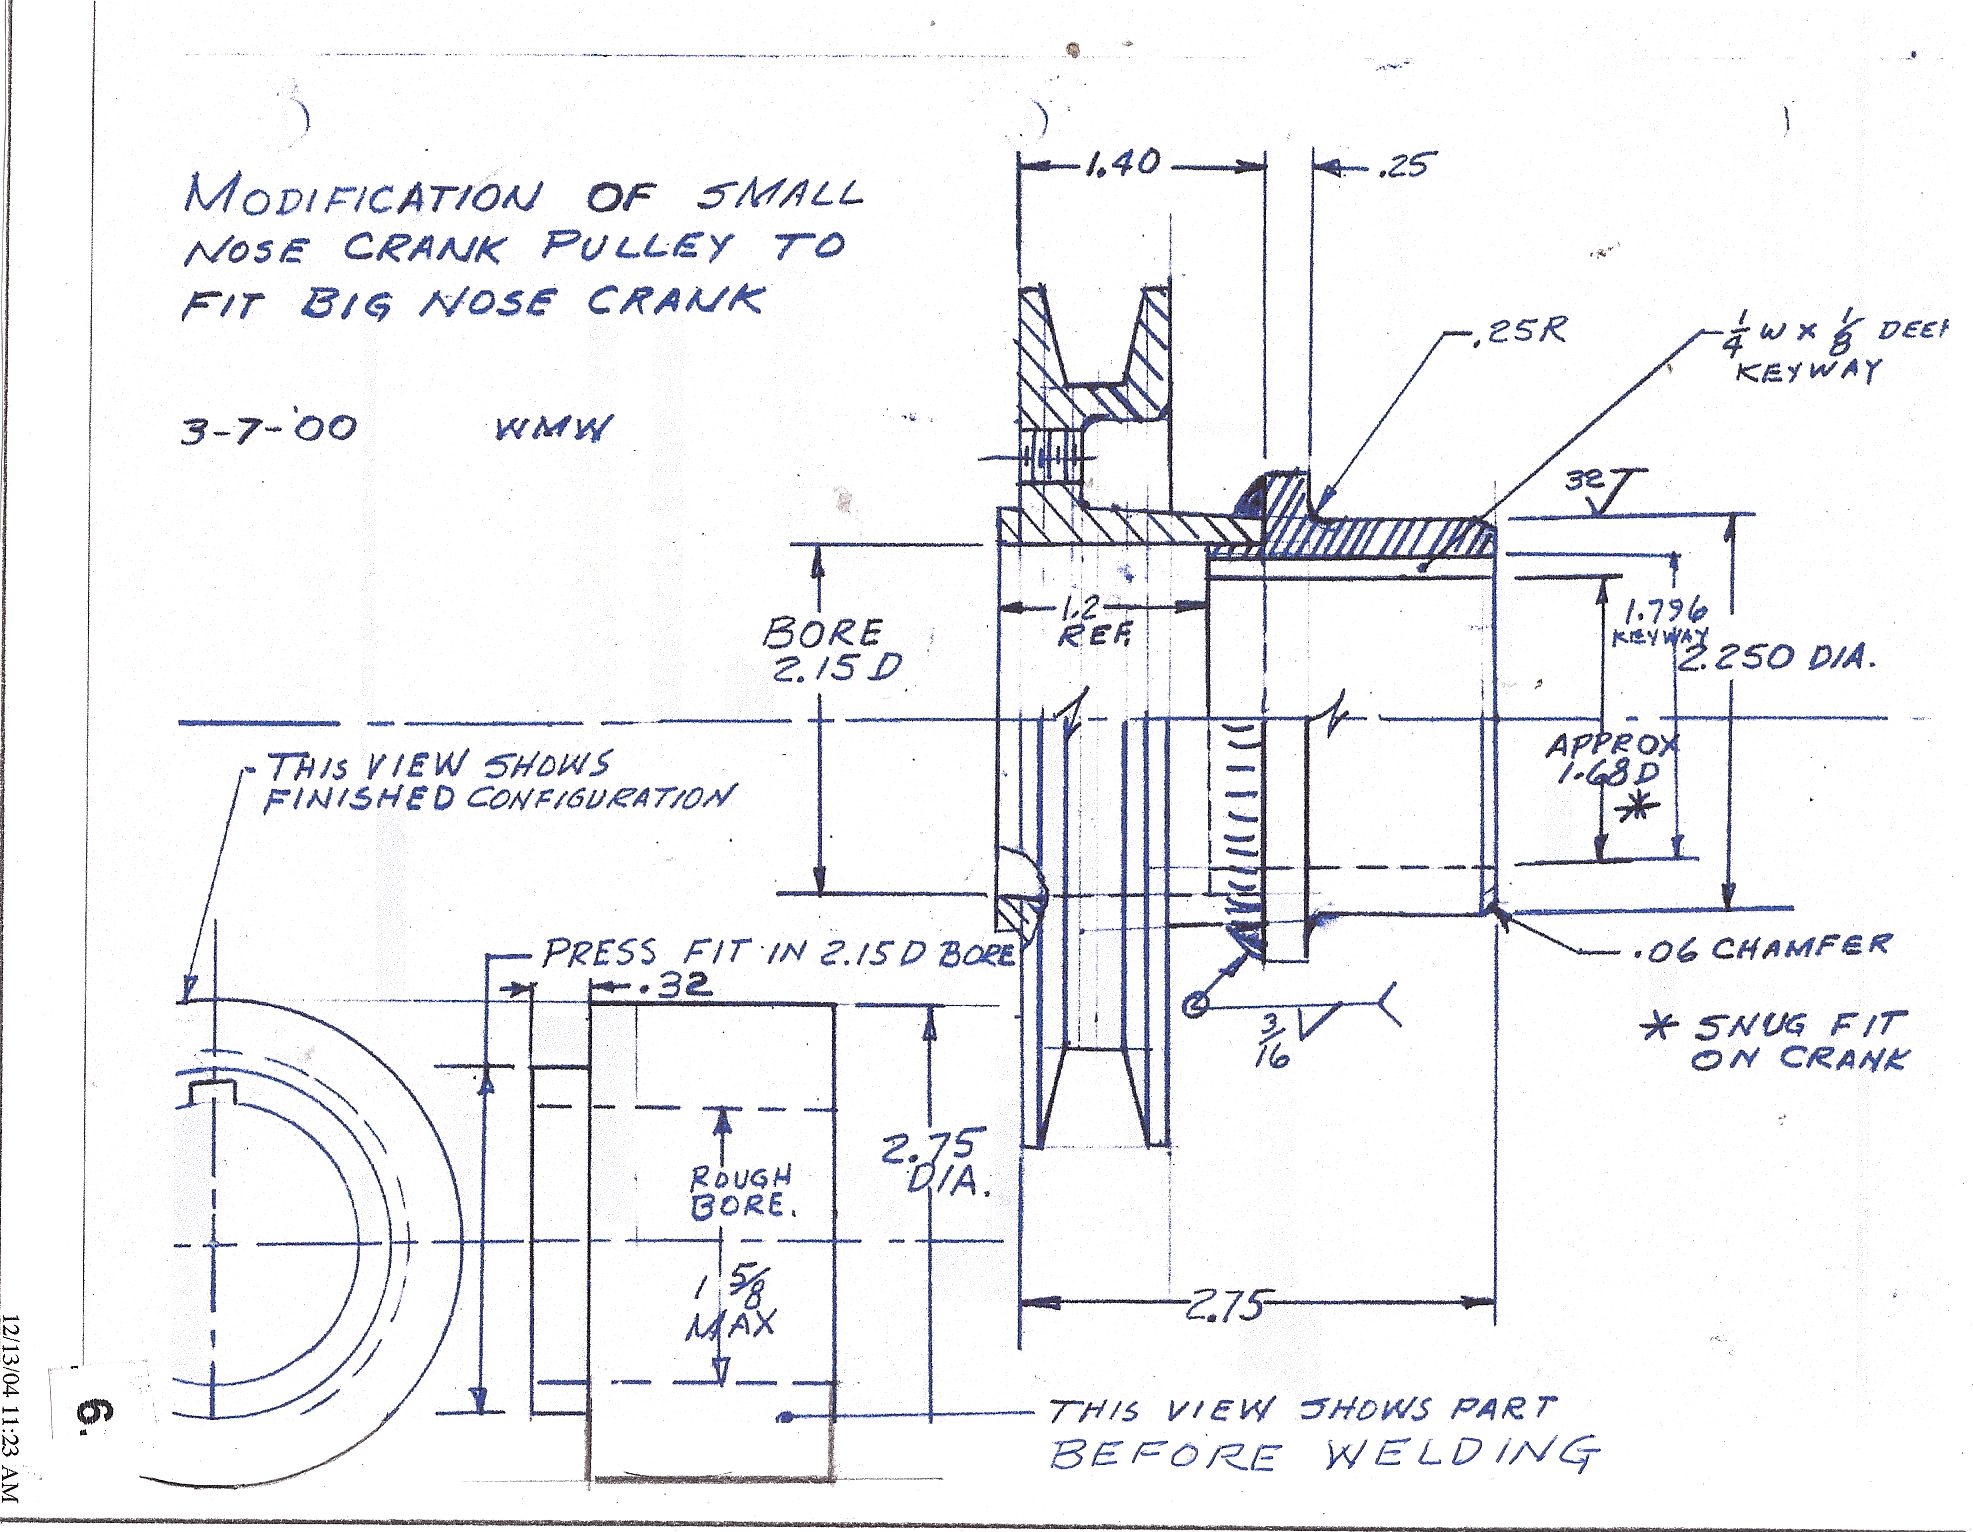
Because of the damage to the crank, I had a straight keyway cut in the nose. This was another disaster as it formed a pathway for oil from the front main bearing. I went all the way to England to find out my mistake when I spun in my own oil near the end of my race at Goodwood. Below is a drawing showing how a small-nose pulley can be modified for a big-nose crank. (click to expand thumbnail to full sized-image)
There are no timing marks on the front of the engine. I added a pointer which is held under a chain cover screw and marked TDC and 40 degrees advance on the vibration damper. The distributor advance reaches a maximum at 4000 rpm, so that’s where I set the timing.
Switching from a small-nose to big-nose crank requires a different timing chain cover, but the cover can be modified and fitted with a modern lip seal in place of the felt seal in the original. See drawing below. This modification can also be applied to the covers on engines that already had big-nose cranks.

Click to expand thumbnail to full sized-image
1.4 Block /Pan.It is important to boil out the block during engine overhauls and it is never all right to put stop-leak treatments into the cooling system because the cooling passages around the front cylinder are small and easily clogged. This results in piston seizure.
There are two types of pans, narrow and wide. The Arnolt comes with a narrow pan, the AC with a wide one. I suppose the wide pan is supposed to cool the oil better, but it is not good enough for racing, so it only adds weight and aggravates the problem of having the oil move away from the oil pump during cornering. It helps to install baffles in front of and behind the oil pump in the narrow pan to arrest the fore and aft flow of the oil.
One of my engines had a wide pan with baffles and little hinged doors. They were effective in keeping oil away from the oil pickup and resulted in bearing failure.
I’ve heard that worn cam bearings are a significant source of oil pressure problems, but I never had that problem. They are difficult to replace because they are all different sizes and require a special stepped reamer.
Cam followers often become pitted. It is possible to replace them with parts that are made from Austin Healey Sprite followers, but they require push rods that are .100" longer.
Ron Leonard of Durango, Colorado sells the cam followers and many other items including head gaskets from Australia. (970) 385-7872.
1.5 Pistons.Bristol engines have excellent pistons; very light weight (8 oz.) and strong. I have used several types of replacements but the best are Cosworth which are similar to stock. Venolia pistons are heavier and made of an alloy that expands more with temperature.
However, I had bad luck with my last set of Bristol pistons which I installed with .003" clearance as specified in the service manual. It may be possible to get away with .003" if there is a long break-in period, but that is seldom possible with a race car. The pistons all seized during practice at the next race. After that I always installed pistons with .006" clearance.
Rings can be purchased from Deves in El Segundo (near LAX), CA. (310) 322 8484. I also found that the 57-61 Fiat Nuova, 2 cylinder, has 66 mm rings, but they require a slightly deeper groove.
1.6 Head.
With the exception of milling for compression ratio, skimming for flatness and fitting of new valve guides, the heads don’t need a lot of attention. In other words, the ports are pretty good as received. You will notice on page 2 that all those springs and washers on the rocker shafts were replaced with nylon bushings that can be purchased at bearing stores. This is a real time saver when reassembling the head.
1.7 Clutch.
The driven disc is 8" dia. with a 1"-10 spline. I don’t know what cars it fits but I have had little trouble finding it in auto supply stores. One was Autospeciality CD50002. Another had a part number P48331, but I don’t know the manufacturer. I have also had new friction material put on them by a local specialist.
1.8 Lubrication.
I used Castrol 15W-50. For racing it is essential to have an oil cooler. The stock oil filter has a pair of ports on the side that appear to be for that purpose. As I recall, it is necessary to add a big ball bearing and a spring to act as a relief valve to prevent the oil from bypassing the cooler. The Volkes oil filter cartridge can be replaced with a filter that is listed for Mercedes, Kranlinator L980. It requires some modification and is fitted inside the expanded metal sleeve of the Volkes filter.
But a better arrangement may be to remove the filter assembly and install a plate with two ports from where you can plumb to a separate oil filter and on to the cooler which is mounted in front of the radiator.
The can of the left side of the engine on the initial photo above is a Moroso 23930 1,5 qt. pistonless accumulator. It is helpful in avoiding loss of oil pressure in tight turns.
1.9 Electrical.
Some clubs in the USA require a battery cutoff switch that can be reached by a course worker in the event of a crash. Beware. Some of the switches on the market, especially the Merit 4450, will fail due to burning of the contacts. I tried two of them with the same result. If you have electrical problems, jumper the battery cutoff switch first.
Y ‘n Z’s Yesterdays Parts in Rialto, CA has a pattern for an entire
Arnolt Bristol wiring harness.Lucas distributor caps are the same as pre-1965 Austin Healey, Lucas No. 40703. The Delco dual point distributor (see picture on p.2) is better. It is also used in Rolls Royce cars of the era.
I used NGK C-6M or C7HSA Plugs. Also Champion Z9Y & Z10.
We are required to install safety fuel tanks for many clubs in the USA. I added an electric fuel pump which has 17.5 gph capacity next to the tank and blanked off the boss on the engine.
The ignition key blank is Taylor 62DG
1.10 Exhaust.
I have run several different exhaust arrangements including two pipes all the way to the back. The best has been to bring the two pipes from the stock 3-branch manifolds back to a point under the firewall where they join a single 3" tube which curves and comes out just ahead of the right rear wheel.
The flange gasket at the connection of the pipe to the manifold is FelPro 9712 which is the same as ‘64 Ford 170 & ‘79 Volvo B27E.
1.11 Misc. engine.
Fan Belt. Gates 223 11/16 x 42.5 (17 mm x 1075); Dayco 22415; NAPA 251C580.
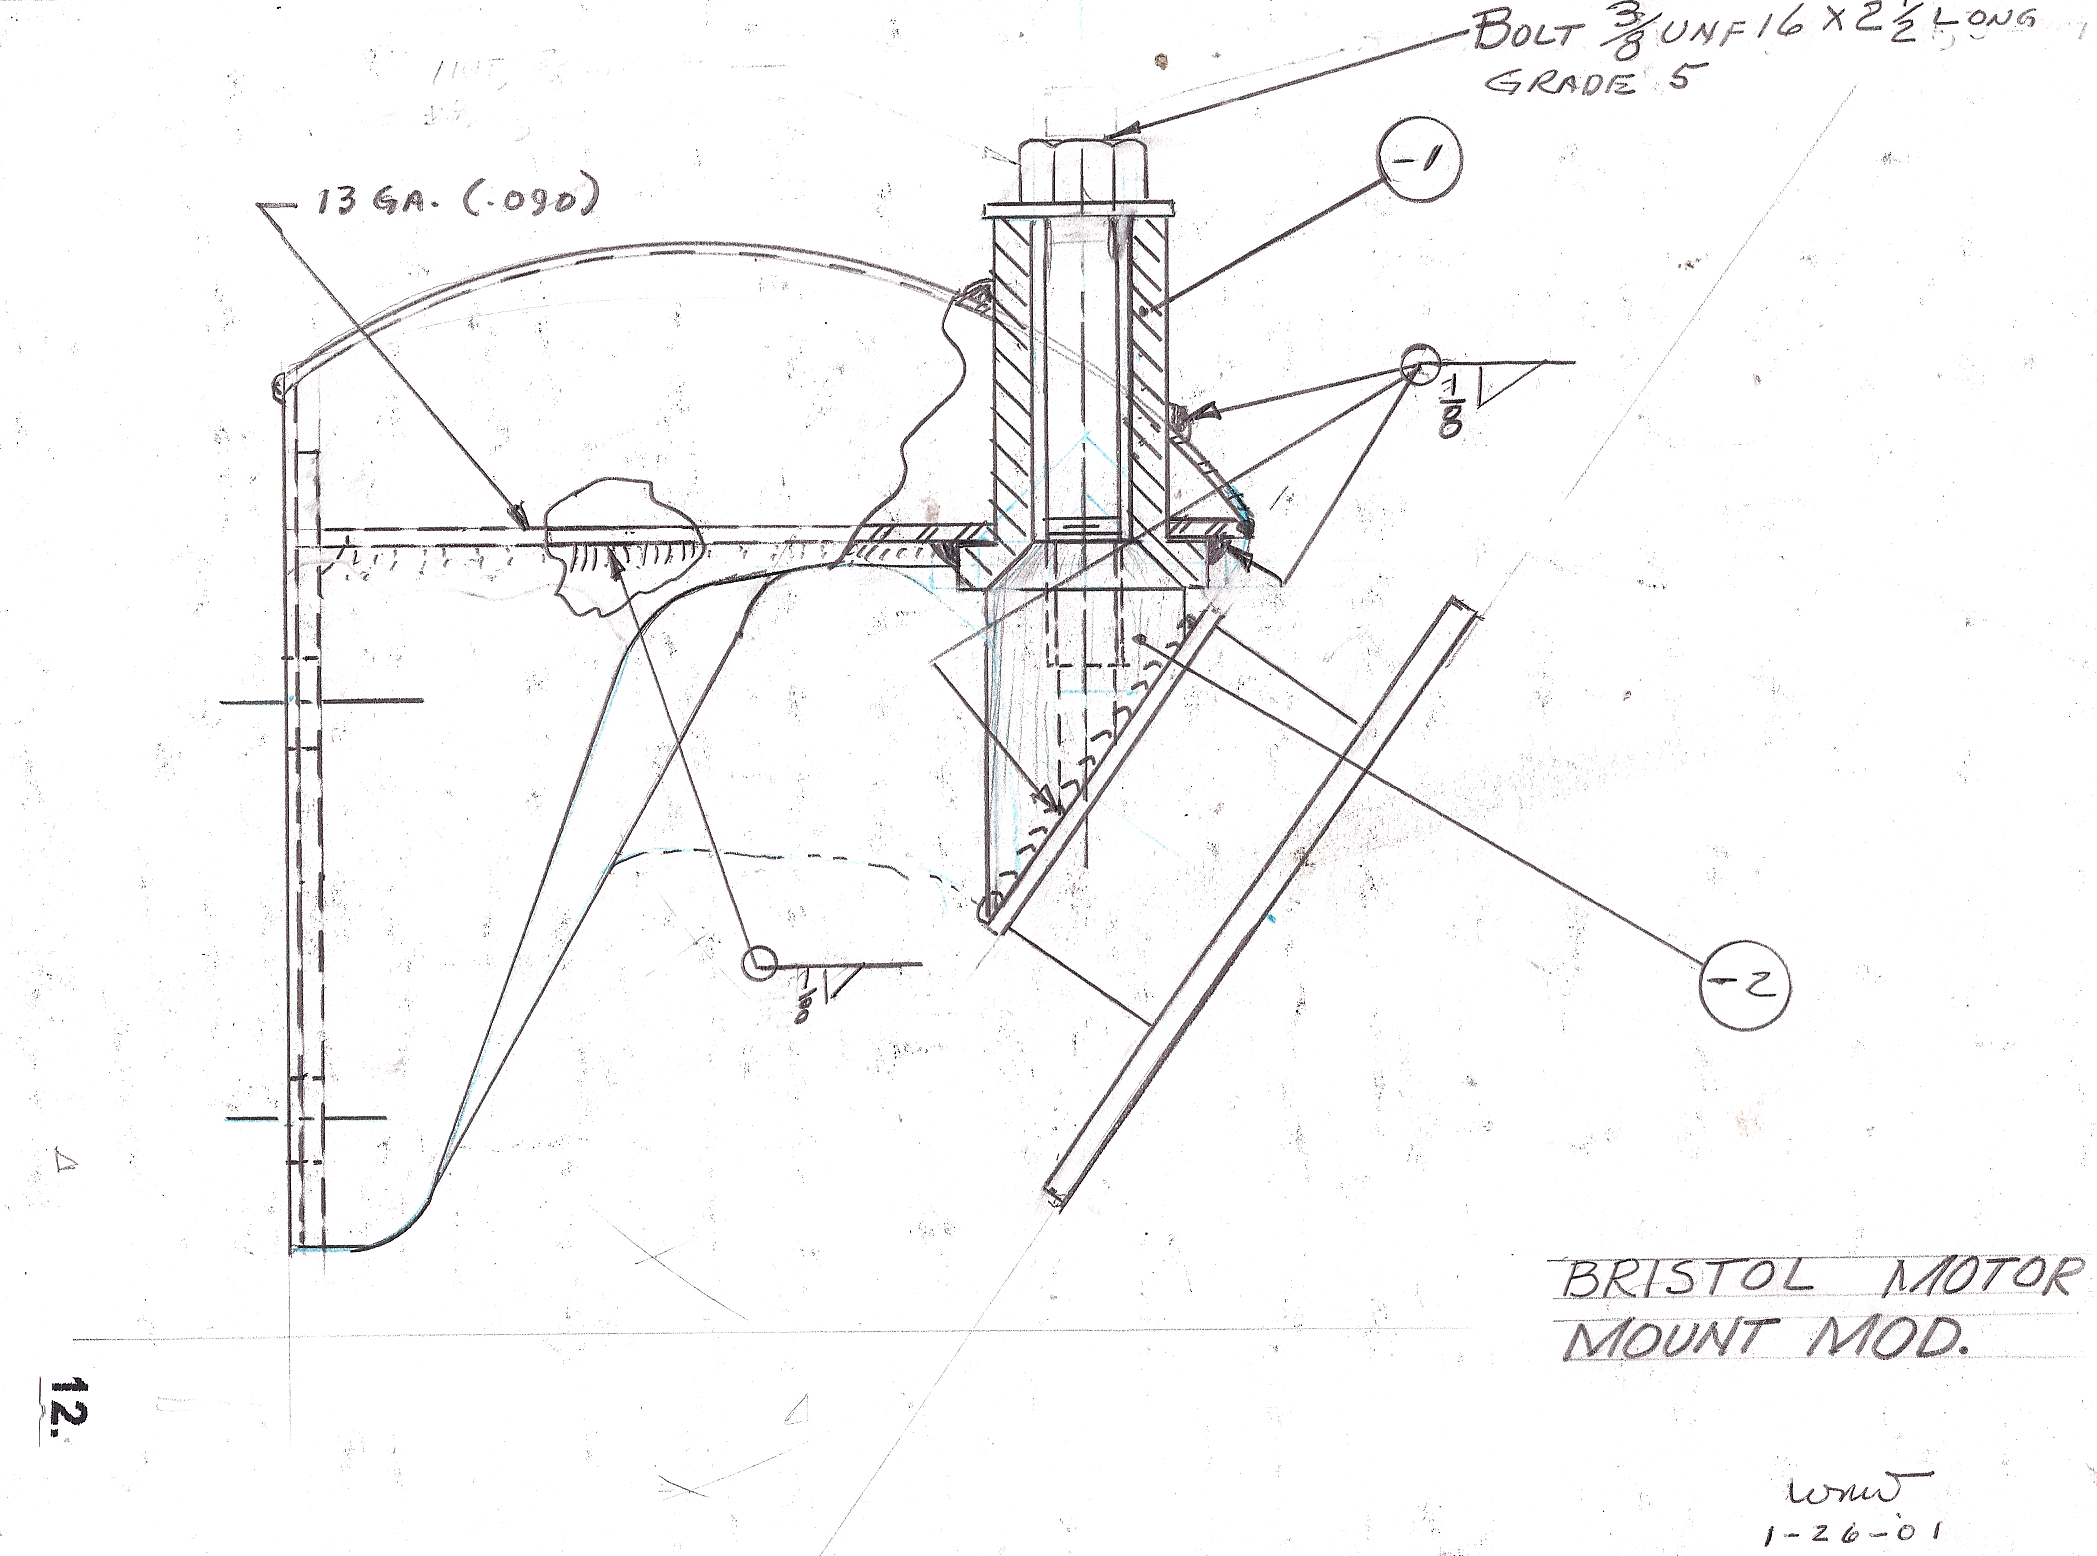
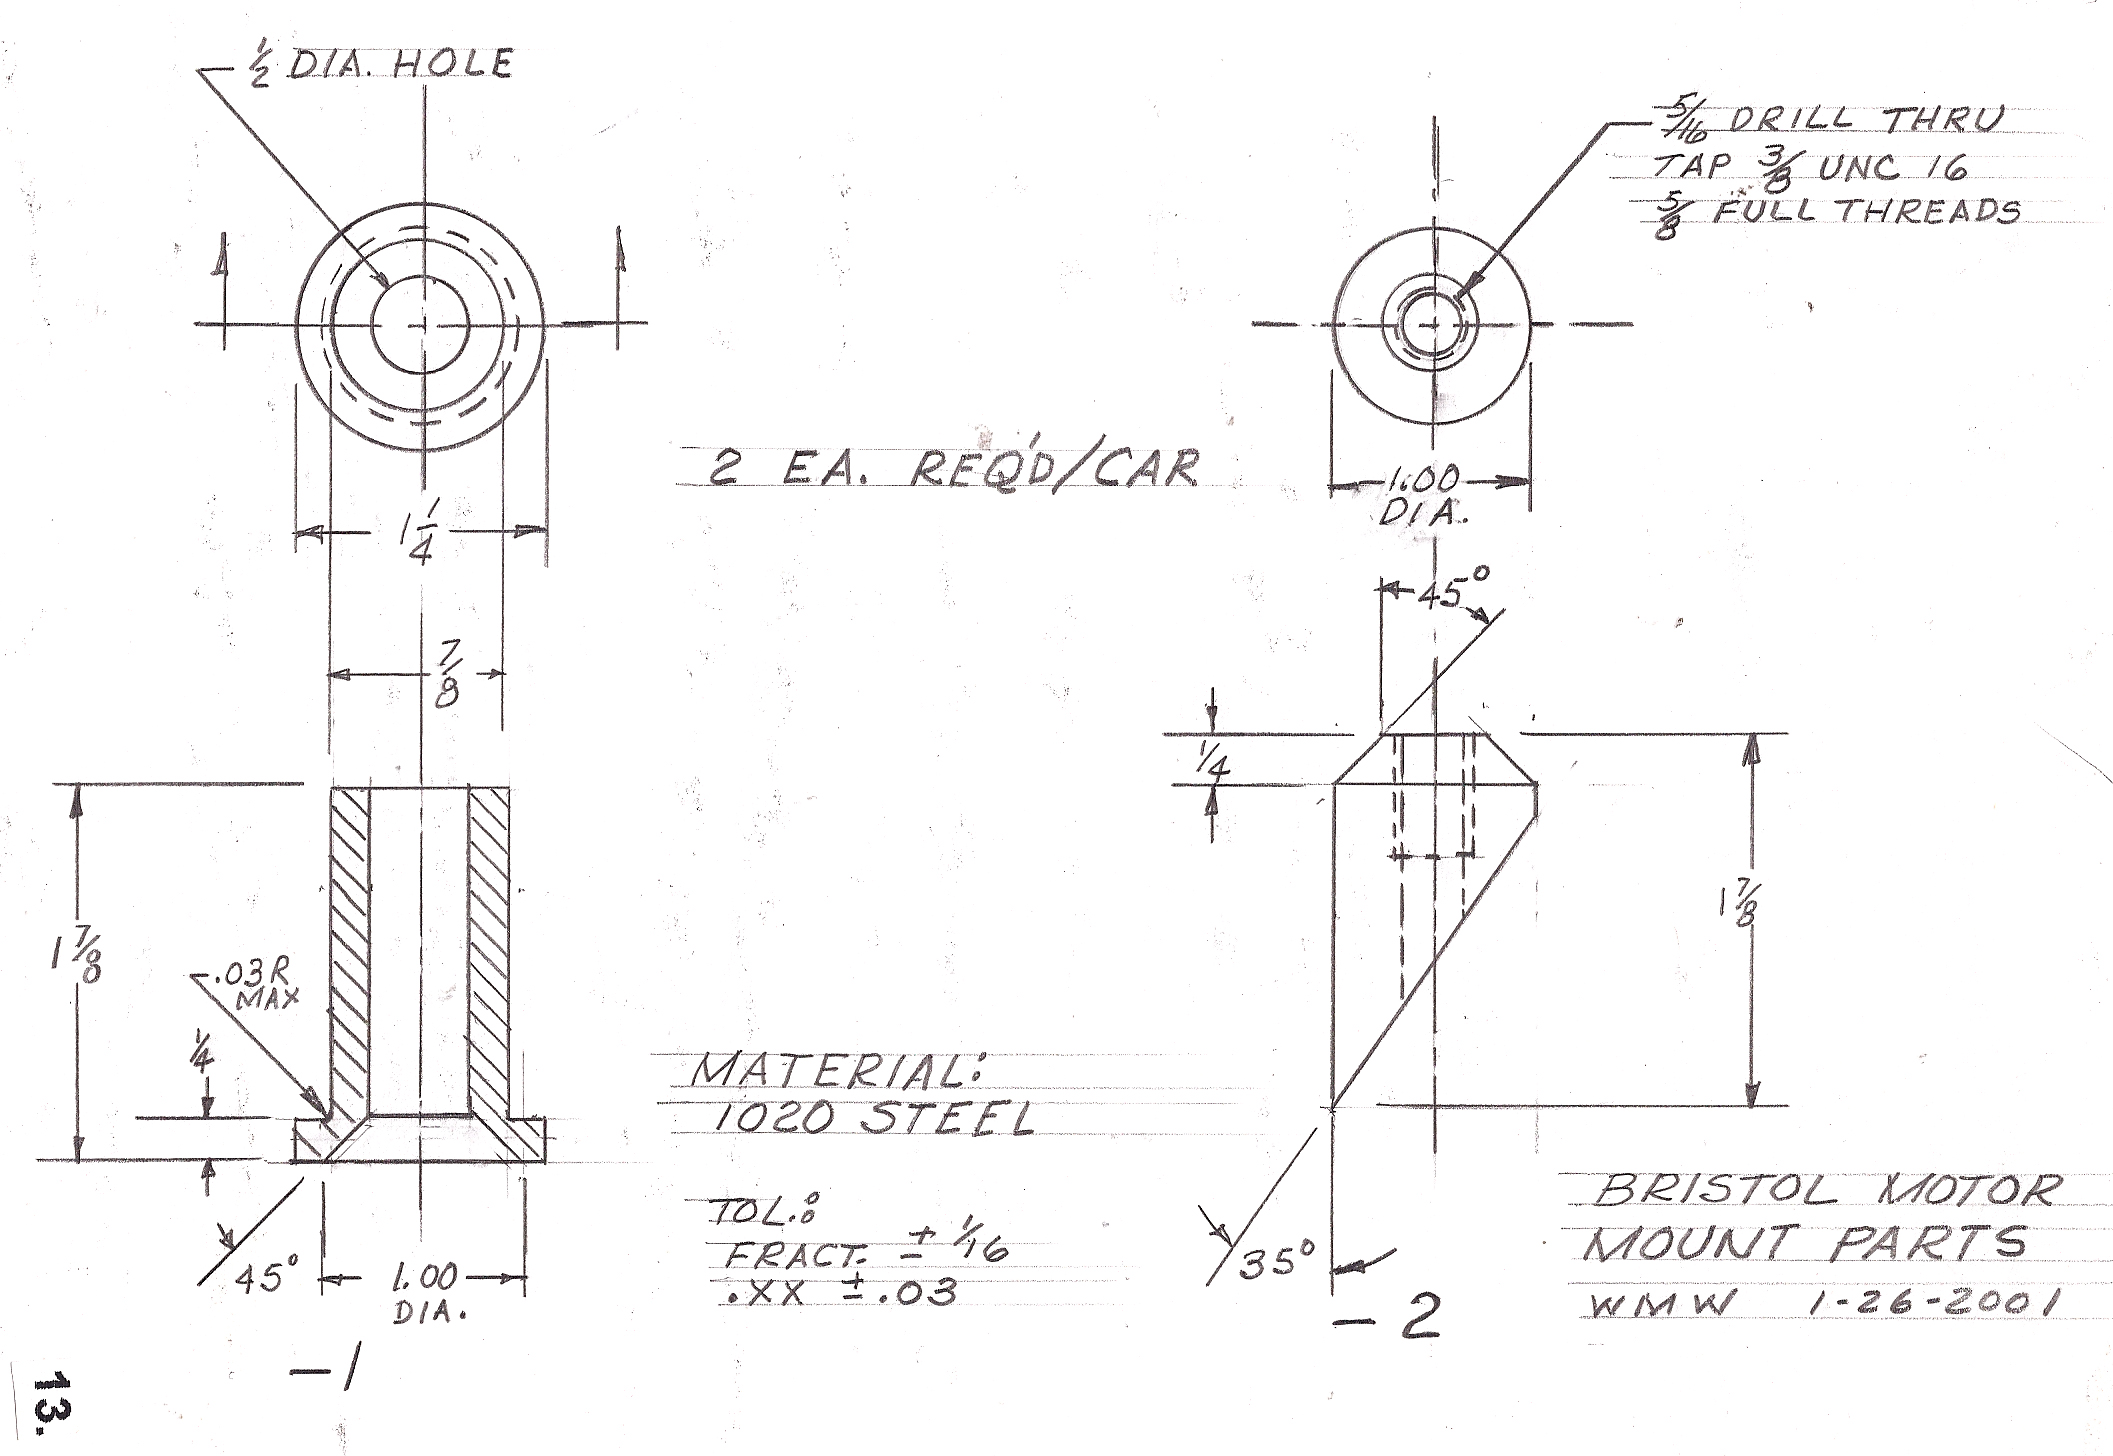
Unfortunately you must unbolt the motor mounts and raise the engine to replace it (if you have a viscous damper). That is easier if you make the modification to make engine removal easier, See drawings below. (click to expand thumbnails to full sized-images)
The fan is not necessary for racing.
The timing chain is Renold BS double strand 114038; 54 pitches = 20.25" long. Inspect closely; I had one break on the Cooper - broken cover and bent valves.
2.0 Chassis.
2.1 Steering.
Inspect the rag joint carefully. I had one fail in a race, but it was holding on by one bolt and I made it back to the pits. After that, I rotated the steering shaft 90 degrees and bolted the two flanges together. Then removed the steering wheel and turned it back 90 degrees. It worked fine; no problem.
2.2 Front Suspension.
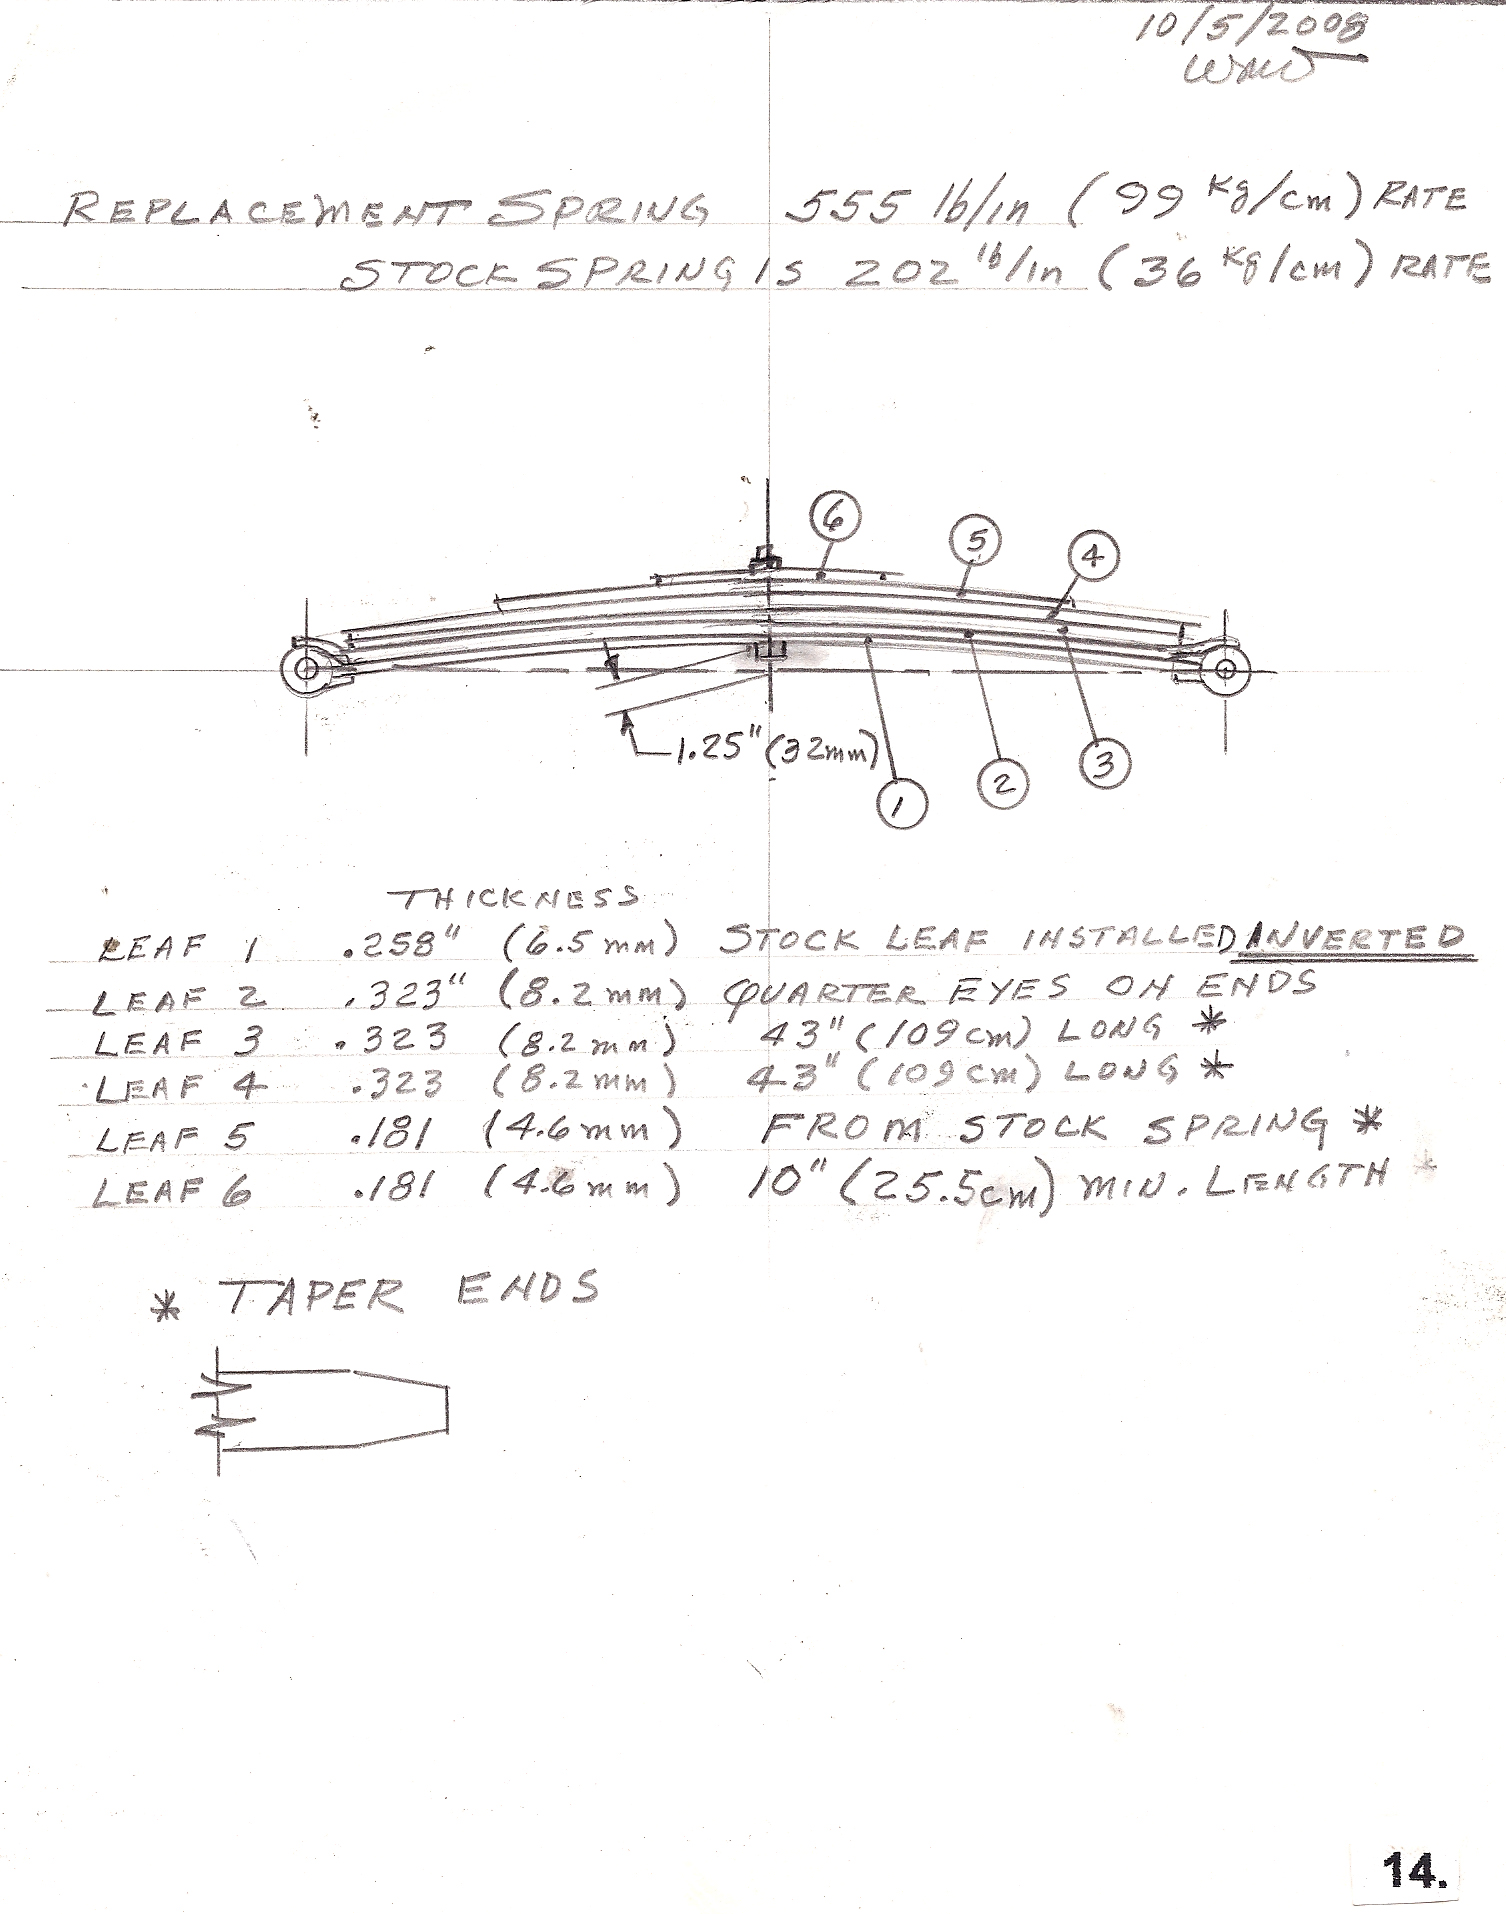
The stock transverse front spring is pretty soft and it contributes to the high cg of the car. The spring rate is about 202 Lb./in. I replaced mine, first with one about 850 lb./in. but later reduced to 555 lb./in. The sketch on p.14 shows the final design. Note that the original main leaf and two others are retained. It is necessary to use the stock main leaf because the length must be very accurate in order to control the wheel camber. The main leaf is installed upside down thereby preloading the assembly. The stress in the main leaf is highest when the car is lifted and decreases as the wheels are loaded.
The wheel camber becomes a degree or two negative which seems to improve handling. The car sits about 3" lower (See drawing and photo below) and requires adjustment of the rear torsion bars to re-level the frame. Read the section on rear suspension before adjusting torsion bars.
click to expand thumbnail to full sized-image
The front shock absorbers can be replaced with Monroe 1000 or NAPA 2168.
The front wheel ball bearings are NDH 3326 or SKF 6306 inner and NDH 77604 (w/shields) or (3304). Seals are CR 15091
2.3 Rear Suspension.
The torsion bars can be adjusted for ride height as shown in the manual. Some cars have a special screw adjuster which makes it easier.
Arnolt Bristols tend to raise the RR tire in tight right hand corners which slows the car and can have a catastrophic effect on half shafts. This can be mitigated by adjusting the torsion bar so that the frame will set 5/8" to 11/16" higher on the right side. The left front will go down by a similar amount. This has been found to be very effective.
The rear shocks can be replaced with Monroe 1067.
2.4 Rear axle.
Early Bristols had forged half shafts. I got hold of a pair when I bought a rear axle assembly from England when I needed a 4.22: 1 R&P for short courses. These never failed.
However, I and other people have had failures using the half shafts in the Arnolt that were machined from castings or billet (I’m not sure
which). There is a serious stress concentration at the boss that aligns the brake drums. The only good thing is that the crack progresses inboard and toward the center of the shaft which traps the ring on the shaft and keeps the wheel from flying off.Re-welded parts appear to be better than new. See drawing below.
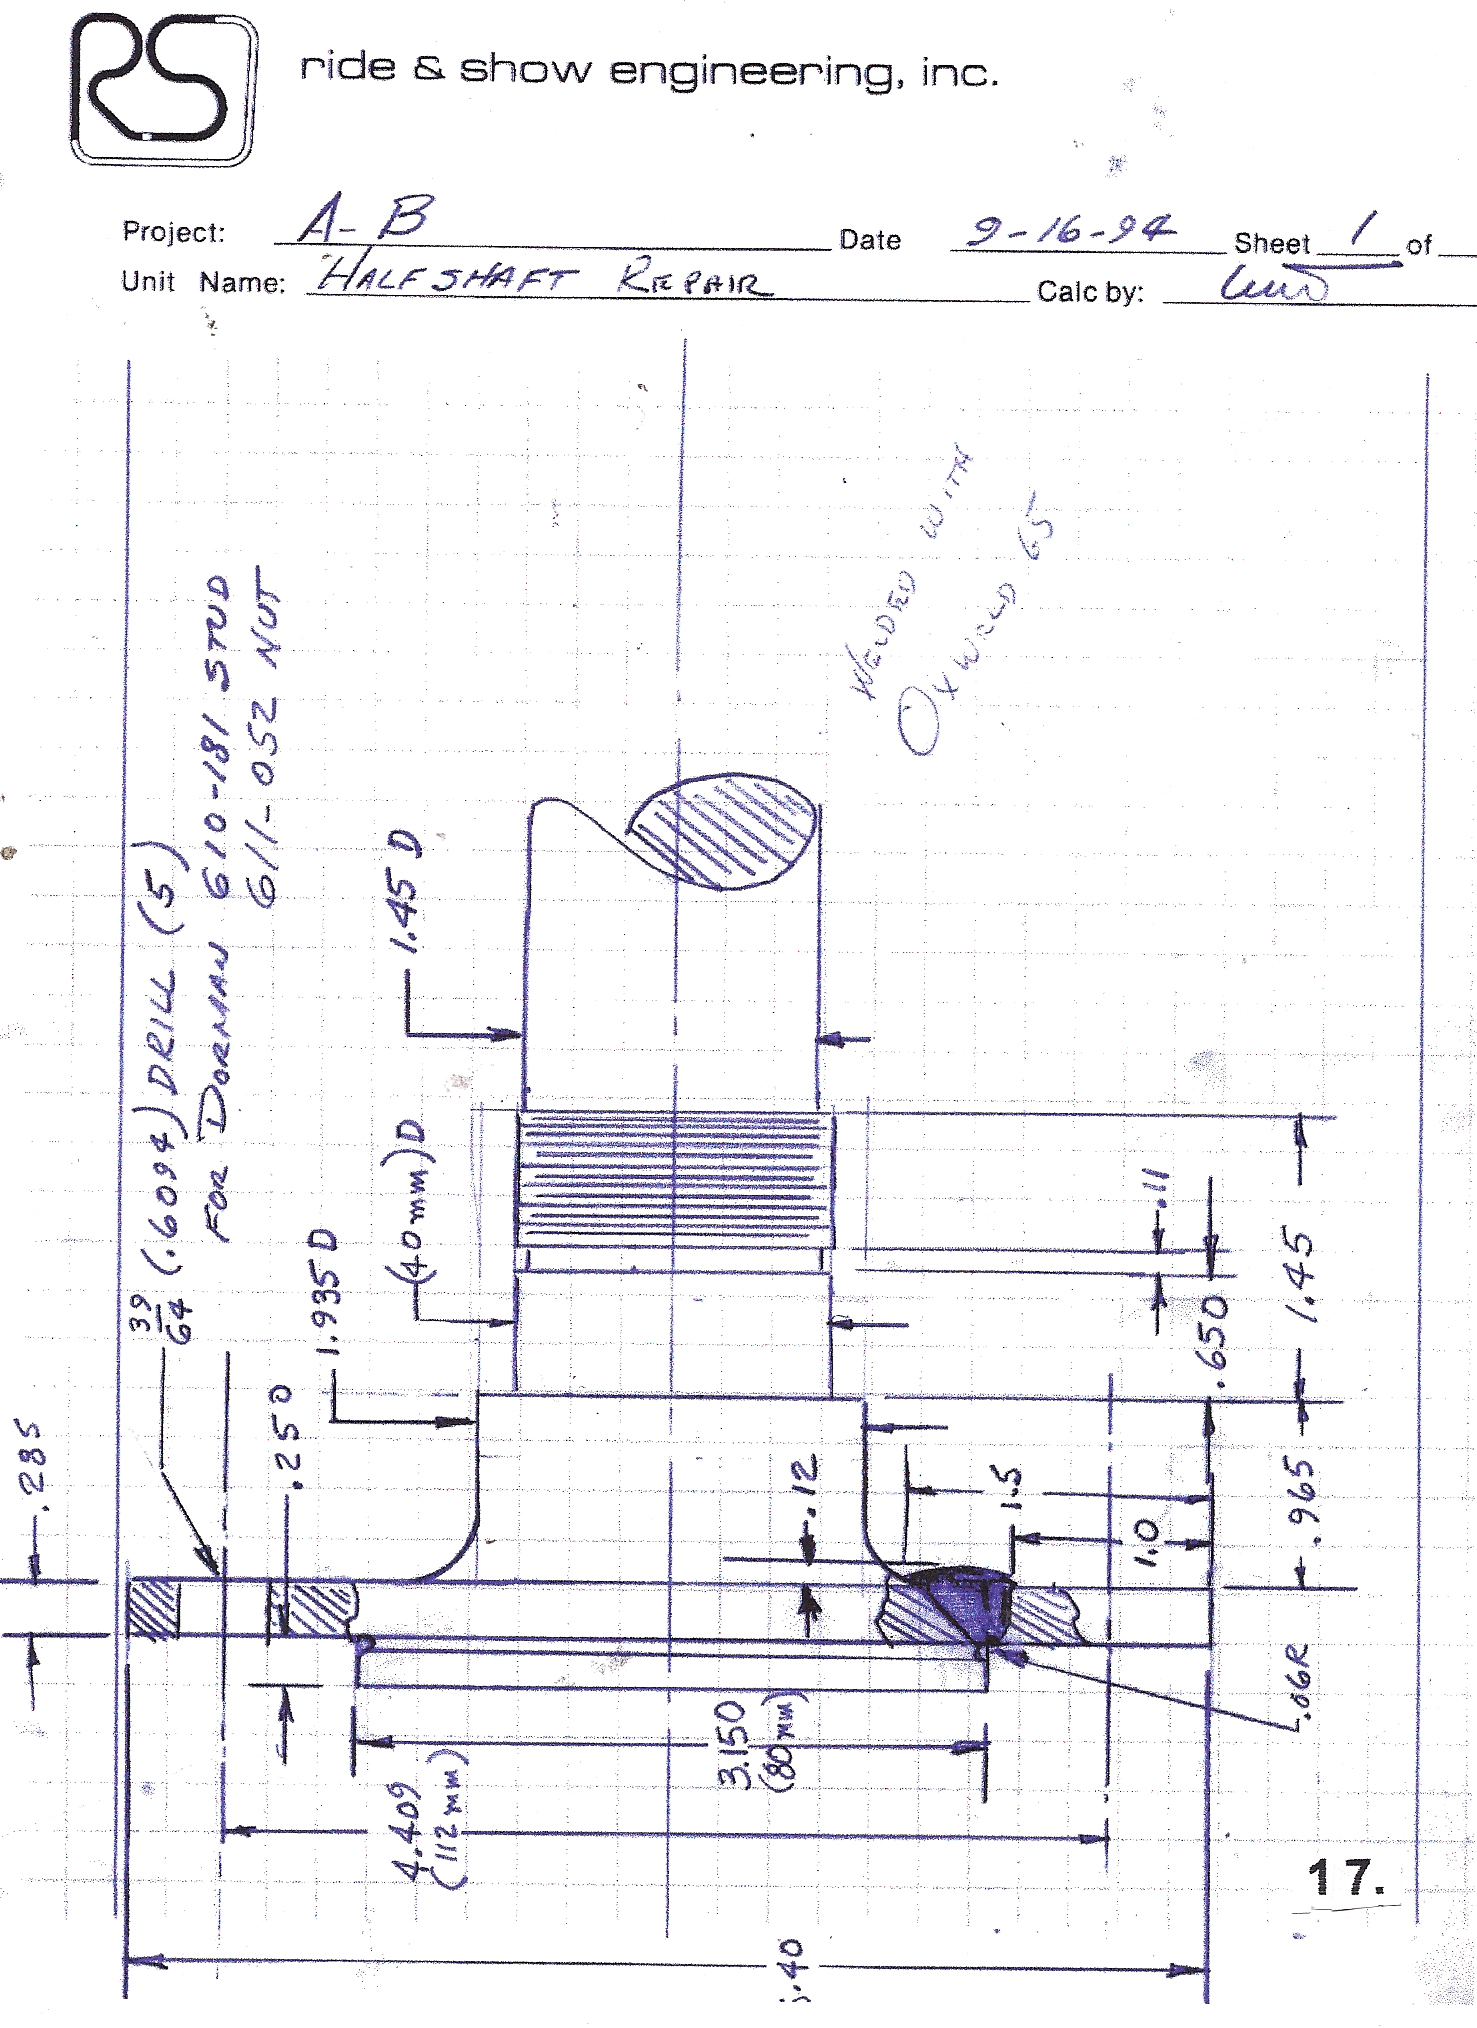
I added the .06 in. radius and shot peened that area in order to decrease the stress concentration. They had a sharp corner there. I never went to a race without spare axles and I often had to use them.
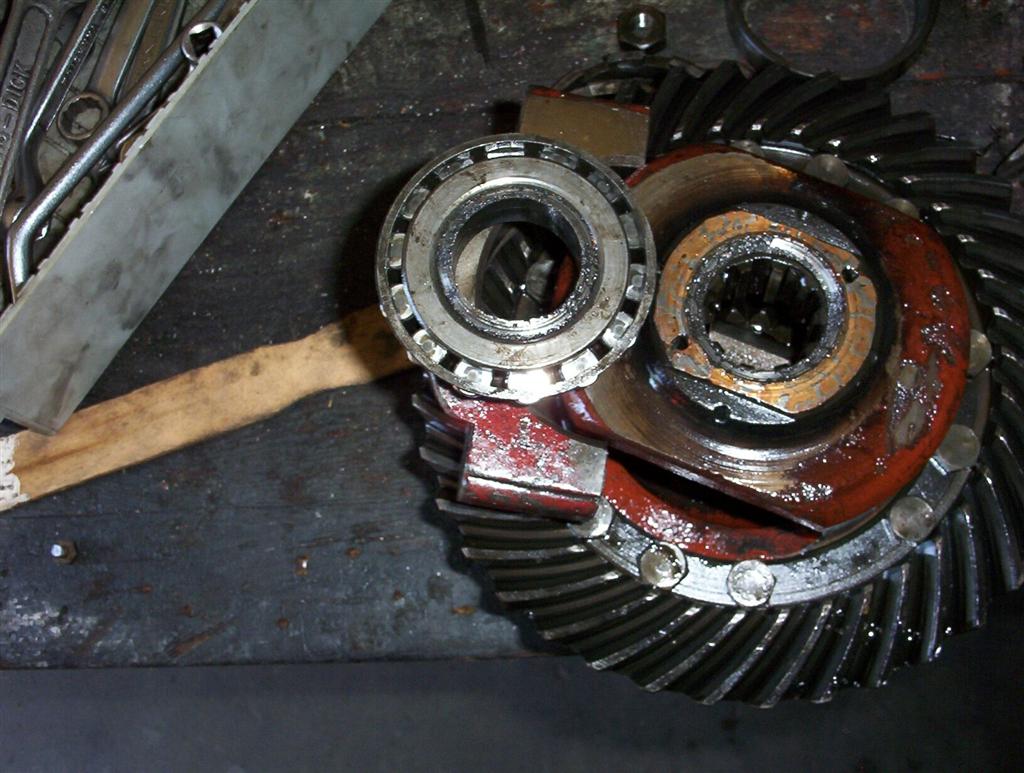
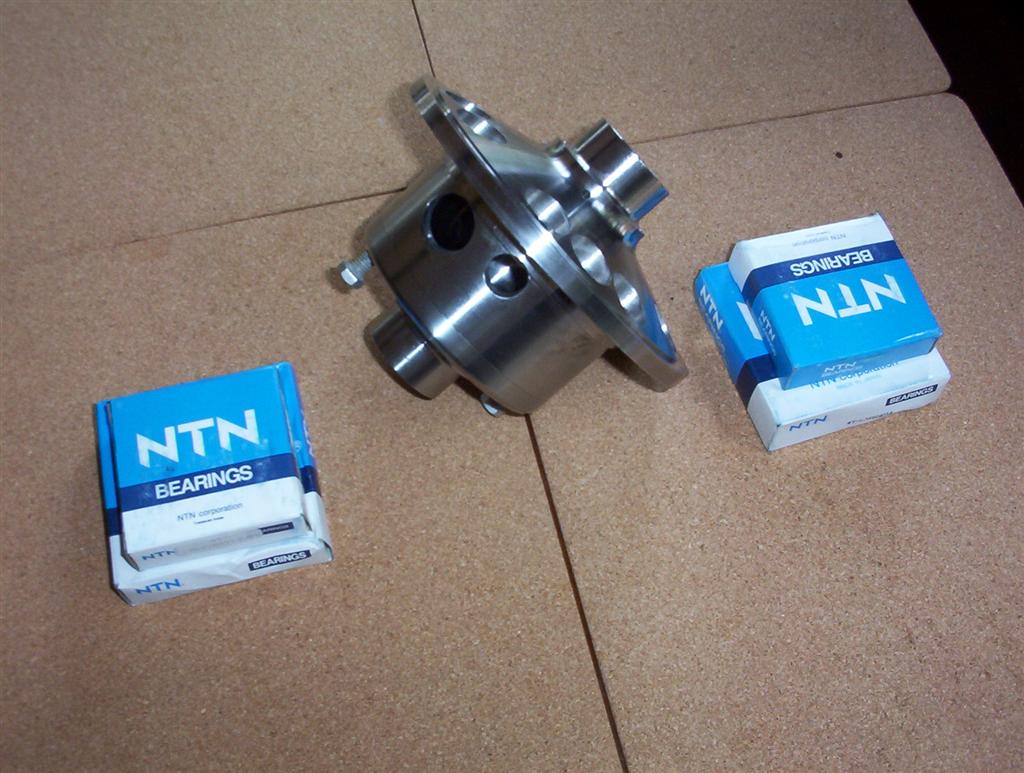
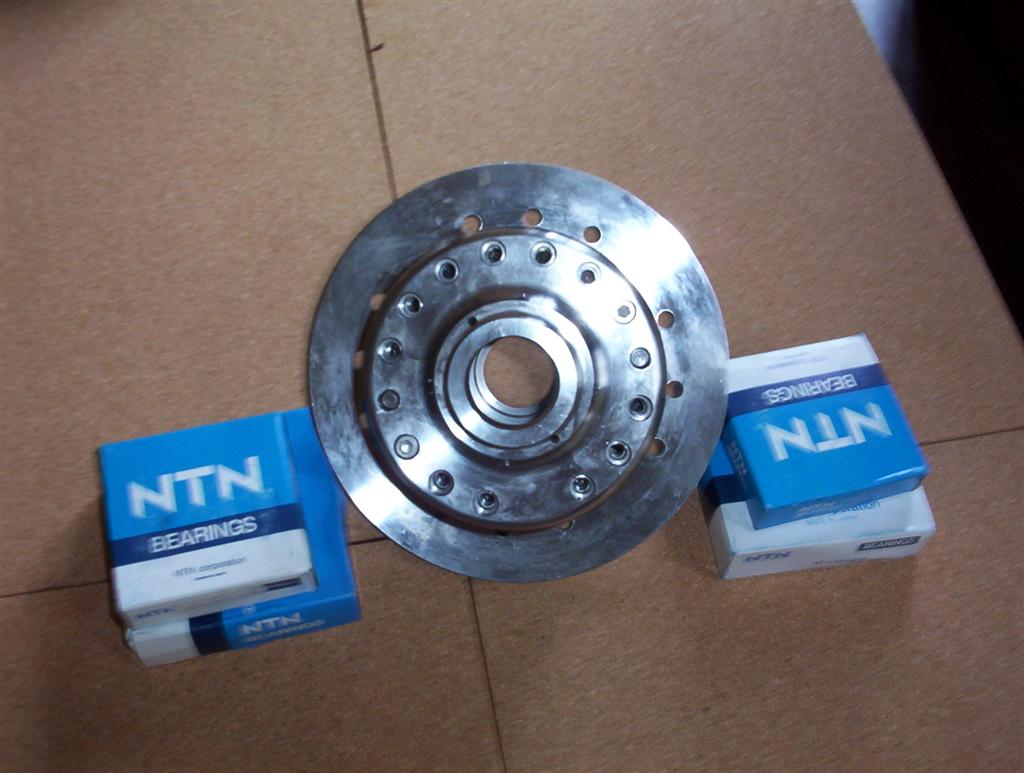
Another serious problem in the rear axle is the crown wheel carrier. I have known of cases where the gears were scrambled due to failure of the trunnions that support the carrier on the tapered roller bearing.
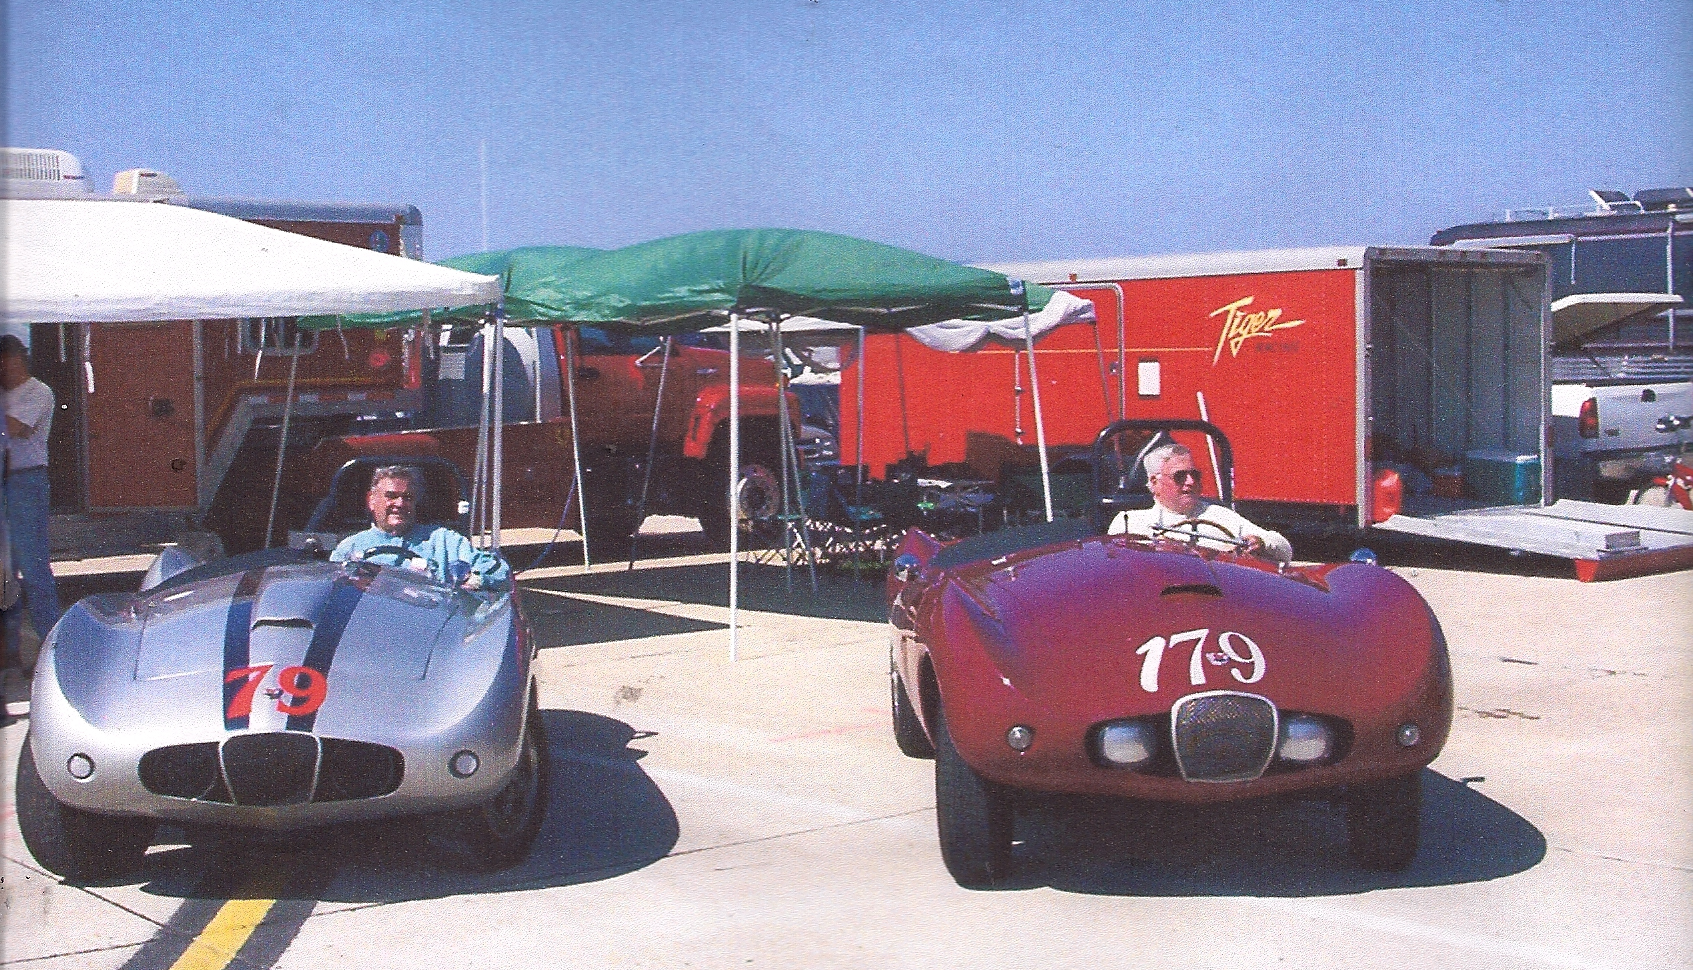
One of the cars that I sold (the red 179 on photo above) had a failure which was detected before serious damage was done. We contracted to have some improved carriers made which used tapered roller bearings with the same O.D.s to fit the case, but have a larger bores which allow the trunnions to be thicker.
I bought one as well and found upon disassembly that one of my trunnions had failed. The end of the half shaft was the only thing supporting it, A way to tell if you have the problem is to pull a half shaft and then try to put it back in. If the trunnion is broken, the gears will not line up and the shaft won’t slide in. These parts were made by: Wayne Mitchell at: CMW Enterprises of Cardiff, CA (760) 942-9170 or email to: www.dogrings.com. The last time I spoke with him he still had some sets (including bearings) on the shelf.
The rear axle bearings are NDH 6208 (with shields) or 3208 (without). The seal is: CR15091
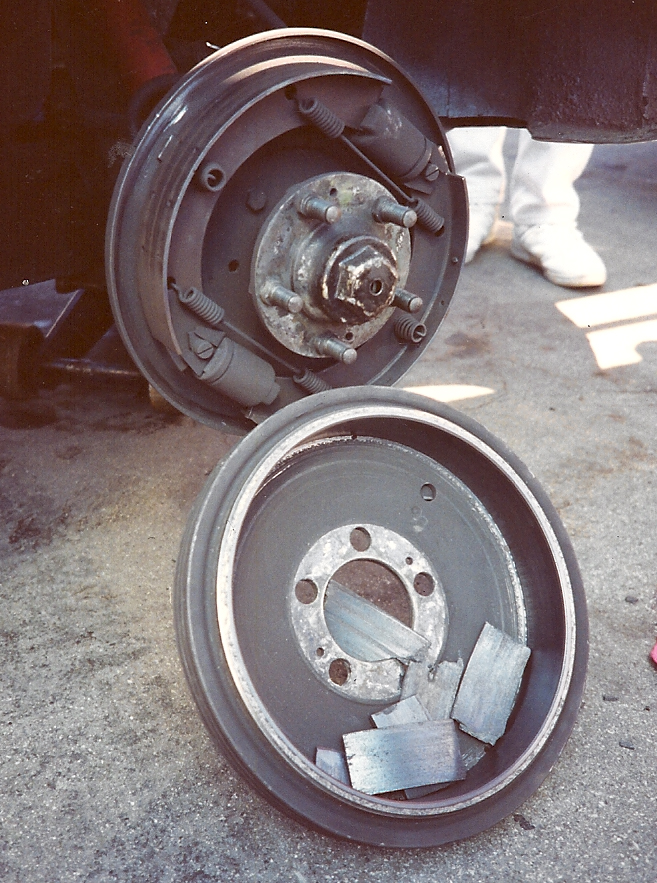
2.5 Brakes.
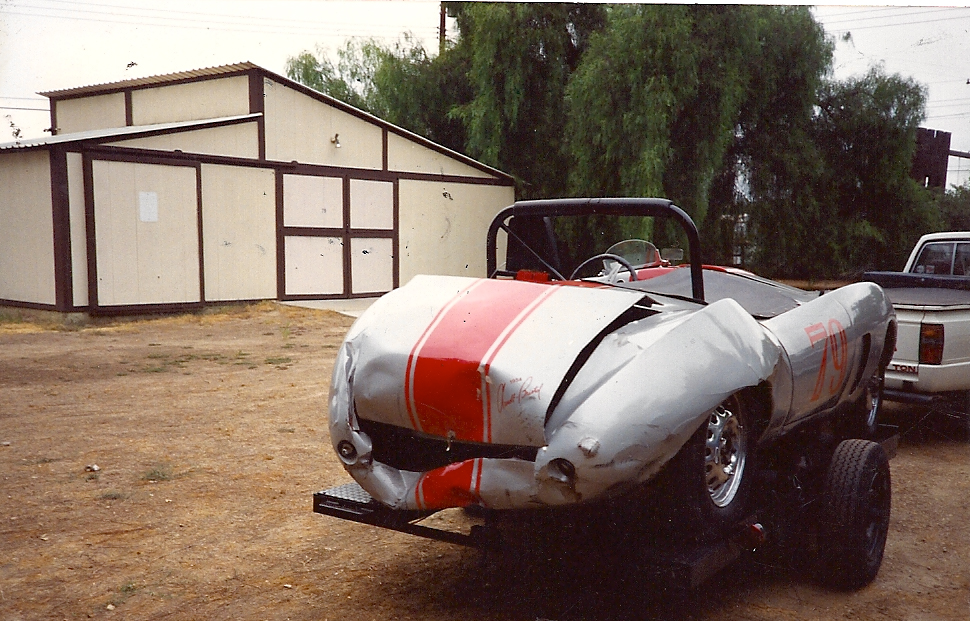
One other thing that I learned the hard way is not to trust bonded brake lining. One time it caused a serious crash in which I spun backwards into a tire wall and shortened the car by about 2 feet. (See photos below). I had another such bond failure on shoes that were relined by a reputable racing service. After that I began adding rivets. I understand that he now does too.
The front brake hoses can be replaced with MG-TC parts. Moss Motors 180-860.
Brake cylinders are the same as Jaguar XK-120.
3.0 Instruments.
I have found several cases of inaccurate instruments, especially the tachometer and oil pressure gage. My tach read 6500 at 6000 rpm and the oil pressure gage read low.
So, other than that, my car was stock (pretty much)!
W.M.W. July 31, 2009